
Most people probably do not know how critical the DNS or domain name services are to the internet. The service essentially translates all web site addresses into the IP address so your computer can connect with it. If your computer or device is unable to translate the machine’s name into the IP address, it will be unable to access the site. The speed and reliability of your network connection is heavily reliant upon these services. Typically, you use the DNS server of your internet service such as through a cable company like Comcast or telecom like Verizon. While they generally work, you might actually be able to improve your network connection by setting up your network or PC to use a public DNS server.
Why Use A Public DNS Server?
What many people do not realize is how many times their connection problems to the internet are caused by DNS failures. This is a particualar problem for many large ISPs that have many users and scattered DNS servers around the country. The reason for this is that often they have to make changes in their networks where the IP address and DNS server of a local loop may change or simply get overloaded. When this happens, your devices act like there is no connection to the internet.
Using a public DNS server can avoid this local link and DNS server failures that can disrupt service. Often the only way to correct these connection problems in your local network is to reboot your network network router. This forces your local router to request new information from your ISP which may correct the problems with the DNS servers but not always. If the failure was at the DNS server specifically, then the use of the public DNS server would have avoided this potential outage. This actually is a fairly prevalent issue with broadband network providers such as cable and DSL networks.
Another benefit a public DNS server can provide is improved performance. You see, the speed of your connection can be highly dependent upon how fast the DNS server is at responding to requests. Many ISPs run smaller servers that tend to do less caching. This requires them to probe addresses it does not know with the authoritative server. This delays the response to your computer as the IP address of a machine being looked up. Larger public DNS servers tend to have larger caches and better connections that means these delays are less frequent which can speed up your internet experience.
How to Use Public DNS Servers
Using a public DNS server is actually quite easy. Essentially you just need to find the IP address for a common trusted server and then setup your PC or even better, your router to use that address instead of the one assigned to it. As for trusted public DNS servers, there are a couple options. The two biggest providers of open public DNS servers are and . Each of these services can be used anywhere in the world and have proven to be extremely reliable.
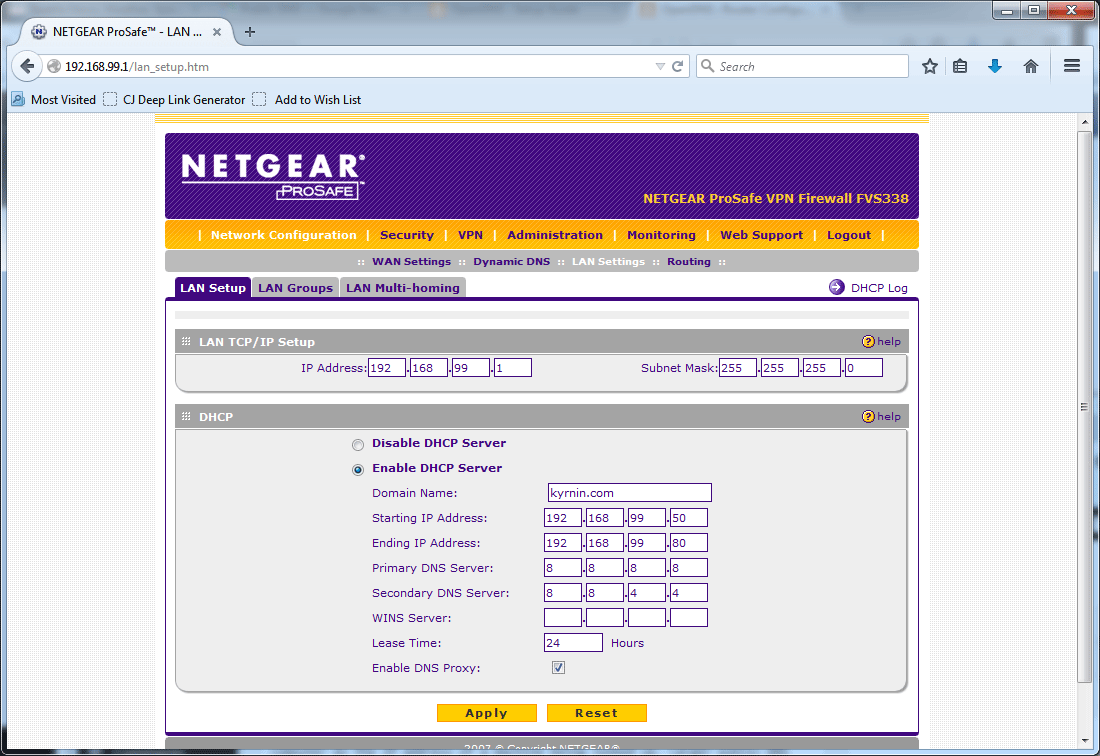
DNS Settings in a Netgear Router
If you have a relatively few number of connected devices or you don’t have access to adjust a router that was provided by your ISP, you can also adjust the DNS settings of your computer or device. The method to do this will vary depending upon the device in use but the primary means to do this is to adjust the network properties for your network connection in the OS of the device. Here is how to do it in several popular operating systems.
For Windows:
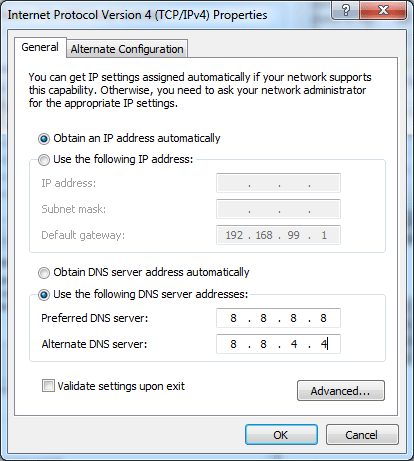
Windows DNS Settings
- Open the Control Panel from either the Run menu or the search function
- Select the Network and Sharing Center from the Control Panel
- Pick the Change Adapter Settings from the left column
- Right click on your network connection from the list and select properties
- Select Internet Protocol Version 4 (TCP/IPv4) from the list and click on Properties
- Select the Use the following DNS servers address radial button
- Enter the primary and secondary DNS servers in the dialog boxes
- Press OK to save your changes
For Mac OS X:

- Open System Preferences from the Apple Menu
- Select the Network preferences paneSelect your network connection from the list
- Click the Advanced button
- Select the DNS tab
- Click the + in the lower corner
- Enter in the IP address of the DNS server your wish to add
- Repeat these steps to add additional servers
A thing to note for Mac users. The order of the list is important as the first entry will be the primary. If there are already entries on the list, they will need to be removed before the new entries are added so the public DNS servers will be the primary. Deleting an entry simply requires you highlight and entry and pressing the – button. You can then use the same steps above to enter it into its new location if you want it a lower position on the list.
Public DNS Problems
Using a public DNS server will not function for all users however. This has to do with your Internet Service Provider (ISP). You see, an easy method of hijacking a computer is to set a computers DNS to use a random outside malicious DNS server. This server will then provide false IP addresses for known addresses in order to hijack the link. This may be to serve ads or be used for a .
As a security measure to help prevent such attacks, some ISPs will restrict any DNS requests outside of their network other than the official servers they provide. While this may be beneficial for security, it has the downside of making the point of failure for connections greater especially if their DNS servers are either overloaded or have reliability issues.
So how do you know if your ISP is blocking external DNS servers? The only way you will know is if you attempt to use a well known public DNS server and it fails to connect you to any website. Generally the result is host unknown error messages or unable to connect messages because the DNS lookup request fails.
In addition to the public DNS servers being blocked, there can also be times when routing issues on the internet may prevent it from working. Your ISP DNS servers are generally fairly close to your local computers. This means that when there are external routing issues, the DNS servers will still provide responses. If you can’t route from your connection to a public DNS server, you will get failures to connect to services similar to as if it was blocked. These issues tend to be fairly rare these days though as routing issues to major public DNS servers also mean major routing issues on the Internet as a whole which mean you still will have connection issues.
Pingback: How to Use Google Public DNS Video Tutorial - Tech for Anyone